
Aadhaar eSign was given legal sanctity through its inclusion in the second schedule of the IT Act via Gazette Notification No. 2015 Jan – GSR 61(E) (the Aadhaar eSign Notification), dated January 27, 2015, entitled “Electronic Signature or Electronic Authentication Technique and Procedure Rules, 2015”. It is a recognised electronic signature under the Second Schedule of the Information Technology Act, 2000.
Aadhaar eSign relies on a combination of asymmetric crypto system and hash functions - which ensures that a document signed using Aadhaar based eSign cannot be tampered with once the eSign has been affixed. The identity of the signer who is using Aadhaar eSign is verified on the fly, using UIDAI powered Aadhaar authentication.
The policy imperative that drove Aadhaar eSign was quite simple – to enable a mode of electronic signature that could be used scalably by 1 billion + individuals on a regular basis. Aadhaar eSign, unlike DSC tokens, is super-easy, time saving – and far easy to drive mass usage in a 1bn+ country like India.
Why is Aadhaar eSign reliable and convenient?
For Aadhaar eSign, all that signers need is:
1) A valid Aadhaar number
2) Linkage between Aadhaar number and phone/email or biometrics
3) Access to their registered phone/email ID or to a biometrics device
How does Aadhaar based eSign work?
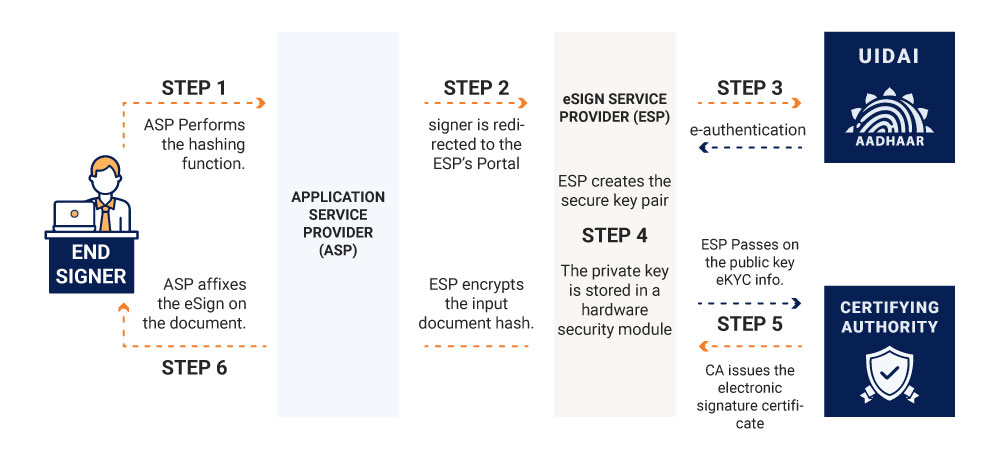
Step 1: Signers view the document, give consent and click on a signing link – on a front-end interface provided by an ASP (Application Service Provider). At this stage, the ASP also performs the hashing function on the document to create its hash result (the input document hash).
Step 2: After clicking the signing link – signers are redirected to a portal maintained by the ESP (eSign Service Provider). Here, the signer enters her Aadhaar number. The ESP asks UIDAI to conduct an eKYC with the Signer. UIDAI sends an OTP to the Signer’s linked mobile or email. The Signer enters the OTP on the portal. If the OTP is correct – UIDAI verifies the identity authentication as successful.
Step 3: Upon successful authentication of the signer’s identity, the ESP creates the Secure Key Pair for the signer.
Step 4: After the key pair generation, the ESP sends the public key and the eKYC information (which it received from UIDAI) to the Certifying Authority (CA) in the format prescribed by the CCA under the eSign API specifications. Upon receiving these particulars, the CA issues the Electronic Signature Certificate for the Signer and passes it onto the ESP
Step 5: The ESP encrypts the input document hash (passed on by the ASP in Step 1) using the private key to create a scrambled hash result. The ESP then passes the Electronic Signature Certificate and the scrambled hash result to the ASP, which then facilitates affixture of the eSign on to the document.
And we’re done. An Aadhaar eSign has now successfully happened. And yes – the process DOES take only a minute (or less).
Seems complicated? All this happens in less than a minute in the back end. For the final signer who is using Aadhaar eSign via Leegality to sign a document, the process will look much simpler.
How to eSign Document using Aadhaar via Leegality
Step 1: The signer views the document on the Leegality platform on his mobile or computer, using the signing link received via SMS and/or email.
Step 2: The signer is redirected to NSDL’s portal (NSDL is the eSign Service Provider) where he has to enter his Aadhaar number. The signer can choose to verify his identity either through OTPverification or through a biometric device.
Step 3: The signer has to consent to his Aadhaar details being used for affixing his Aadhaar eSign
Voila! The electronic signature certificate gets affixed on the electronic document. You have successfully eSigned your document. You can view the signed document once all the signatories have signed. A copy of the completed document along with the audit trail is sent instantly to the sender and all the signatories.

.avif)